Greek Gyros

May 15, 2022
Serves 20 People
Equipment
grill, spit, rotisserie
Prep time
1m
Cook Time
1h 30m

Greek Gyros
Print Recipe
Greek Gyros
Print Recipe
Ingredients
Servings:
Instructions
  1. Cut pork shoulder into slices (thin country rib steaks). Pound with meat tenderizer to make flat mix all spices together, marinade meat in a large bag or bowl overnight stack meat onto rotisserie. cook until 165 , slice some off into a pan let remaining meat cook further, serving another every few min serve on grilled pita with tzatziki french fries, tomato and onions.
Share this Recipe
 

Italian Beef

August 15, 2021
Serves 10 Sammys
Prep time
1h 0m

Italian Beef
Print Recipe
Italian Beef
Print Recipe
Recipe Notes

Portillo's Italian Beef Hack
Most major cities in the U.S. have a sandwich that locals proudly claim as their own. For Chicagoans that sandwich is the Italian Beef. Thin-sliced roast beef is dunked in herbed gravy to soak up the flavor, then it's stacked on a warm Italian sandwich roll and topped with sweet peppers or spicy hot Giardiniera. The recipe may seem like a simple one, but if any component of this iconic sandwich isn't faithful to the Chi-Town original, true beef fanatics will cry "foul" quicker than bleacher bums at Wrigley field.
Prep Time15 mins
Cook Time15 mins
Total Time30 mins
Servings: 4
Author: Todd Wilbur
Ingredients
Gravy

1/4 pound beef fat trimmings
4 cups water
2 Knorr beef bouillon cubes (double-size cubes, or use 4 standard size)
1 1/2 teaspoons Kitchen Bouquet Browning & Seasoning Sauce
1 teaspoon lemon juice
1/2 teaspoon dried oregano
1/4 teaspoon salt
1/4 teaspoon ground black pepper
1/8 teaspoon garlic powder
1/8 teaspoon ground cayenne pepper
Pinch of MSG

Rolls and Beef

4 Turano, Gonnella, or Amoroso sandwich rolls
1 pound roast beef, London broil or Italian style roast beef, sliced very thin

Optional Topping

Marconi hot giardiniera --or--
Cooked sweet peppers

Instructions

Preheat the oven to 400 degrees F.
Render the beef fat by chopping it into small bits (about the size of peas) with a food processor. Be sure the fat is very cold--it will chop better. If you don't have a food processor, you can chop the fat by hand. Use a sharp knife and cut it as small as you can. Heat up the fat in a sauté pan over medium heat until the bits are browned. Strain the solids from the fat and measure 1/4 cup of fat for the gravy.
Make the beef gravy by combining all of the ingredients, including the beef fat, in a medium saucepan over medium heat. When the mixture begins to boil reduce the heat and simmer for 5 minutes, then turn the heat to low.
Make the sandwiches by heating up the rolls in the hot oven for 3 minutes.
For each sandwich, drop 1/4 pound of sliced beef (separate the slices) into the gravy for 2 minutes. Make sure the gravy isn't boiling. It should be around 180 degrees F. After the beef has soaked in the gravy, use tongs to arrange the beef on a warmed sandwich roll and top with your choice of hot giardiniera or sweet peppers. Or both. Spoon on some extra gravy just before serving.
 

Share this Recipe
 

Sourdough Bread

July 21, 2020

Recipe for Wild Yeast Sourdough Bread

Sourdough Bread
Print Recipe
Prep Time
1 day
Cook Time
50 min
Prep Time
1 day
Cook Time
50 min
Sourdough Bread
Print Recipe
Prep Time
1 day
Cook Time
50 min
Prep Time
1 day
Cook Time
50 min
Share this Recipe

Sourdough English Muffins

June 26, 2020

Sourdough English Muffins

Print Recipe

Sourdough English Muffins

Print Recipe

Recipe Notes

How to make sourdough english muffins

These overnight english muffins are a great way to use leftover sourdough discard.

Please scroll down to the recipe card below for the full recipe, but here is an overview on how to make this recipe:

  • Feed your sourdough discard and wait for it to become active.
  • Perform a float test to make sure that your discard is active and ready.
  • In a large bowl, combine your active sourdough starter with only 2 cups of the flour and water (reserve the remaining cup of flour for the morning). What you have created is called a poolish or levain. Cover the bowl with plastic wrap and allow it to sit on the counter overnight (or 7-10 hours).
  • In the morning, prepare a rimmed baking sheet by sprinkling it with half of the cornmeal.
  • Mix the baking soda, salt, and sugar into the dough.
  • Using 2 TBSP at a time, mix in the remaining 1 cup of flour, until the dough is no longer sticky.
  • Turn the dough out onto a lightly floured surface and roll to a 1/2″ thickness. If you make them too thick, they won’t cook all the way through.
  • Using a 3″ biscuit cutter, cut as many rounds as you can. You can reform the dough scraps back together and cut more, but be careful not to overwork your dough or your english muffins won’t turn out right. You should just be able to get twelve.
  • Place the english muffin rounds onto the prepared baking sheet and lightly dust the tops with more cornmeal.
  • Cover the english muffins with a clean kitchen towel and allow to rest for 45 minutes. They won’t rise much at this time. That is ok, the magic will happen when you start to cook them.
  • Heat a lightly oiled skillet over medium high heat.
  • Place an English muffin on the skillet and cook for 3-5 minutes, or until the bottom is light-medium brown.
  • Flip over and cook for 3-5 minutes on the other side, until both sides are golden brown and the sides of the english muffin are dry. You can cook more than one muffin at a time, but do not crowd the skillet. Only do 2 or 3 at a time.

Share this Recipe
 

Buns

June 26, 2020

Buns
Print Recipe
Buns
Print Recipe
Share this Recipe
 

Sourdough Waffles

June 20, 2020

Recipe to utilize Sourdough Starter you might otherwise throw away

Sourdough Waffles
Print Recipe
Sourdough Waffles
Print Recipe
Recipe Notes

Ingredients

  • 190 grams sourdough starter
  • 100 grams milk
  • 2 large eggs
  • 100 grams flour
  • 1 1/2 teaspoons baking powder
  • 30 grams sugar
  • 5 grams salt
  • 20 grams butter (melted)

Steps to Make It

  1. Gather the ingredients.
  2. Preheat your waffle iron to medium or dark and preheat your oven to 200 F.
  3. In a large bowl, whisk together the sourdough starter, milk, and eggs until completely incorporated.
  4. In another bowl, mix together the flour, baking powder, sugar, and salt.
  5. Add the dry ingredients to the wet. Add the melted butter and mix until just incorporated.
  6. Ladle onto the preheated waffle iron. Cook for approximately 4 minutes until golden brown and fragrant. Times will vary depending on your specific waffle iron.
  7. Keep the first waffles warm in the oven while you cook the rest of the batter. When all of the waffles are done, remove from oven and serve immediately. Store leftovers in an airtight container for up to three days and heat before serving.

Recipe Variations

These waffles make a great stand-alone breakfast and they are fantastic as part of a big brunch spread. They also hold up well under extra toppings:

  • Top with berries and whipped cream.
  • Use as the bread element of a breakfast sandwich.
  • Top with fried chicken and serve with syrup and hot sauce. The sourdough flavor of these waffles pairs beautifully with the chicken.
  • Or go full savory, with toppings like gravy, cheese, bacon, and eggs.

Share this Recipe
 

Ribs-Baked

December 30, 2017

Rob’s Traditional Chicago Style Baked Baby Back Ribs.

Print Recipe

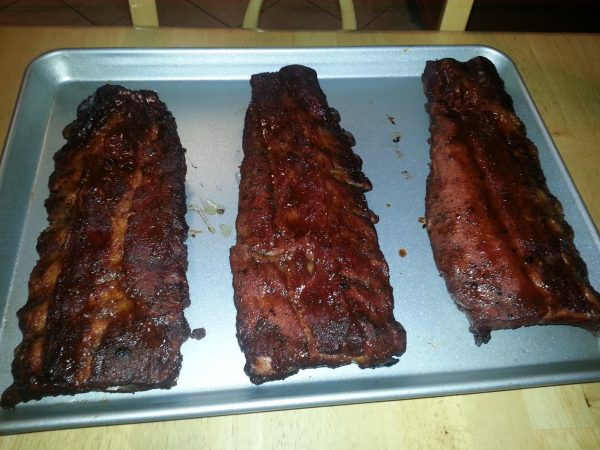
This recipe is for the style of making ribs you see in Chicago and the midwest that are baked in the oven, with BBQ sauce added at the end.
I started working on this recipe in the 1990's and have made changes over time to get to this point. As with any meat, it's not all science, so use your own judgement on salt, pepper, and sauces.
The critical steps are removing the silverskin, wrapping the pan tightly in foil, and finishing at high heat for just a few minutes to burn in some sauce and flavor at the end.
Enjoy!
Rob

Ingredients


Servings:

Instructions
  1. Either have the butcher do this for you, or do it yourself, but it is important! Remove silverskin from bottom of rack of ribs. use a knife to get it started, then grip it with a paper towel and pull it off. Also cut any excess fat as desired. Youtube if you must….

  2. Prep Ribs - Coat with Brown Sugar, black pepper, Kosher or Sea Salt and a good pork rub (mom has that LBJ rub, which is great) and paprika for color. Coat well – especially use a good amount of brown sugar. The meat should be totally covered in rub, don’t hold back too much.

  3. Cut up a couple cloves of garlic, an onion in eighths and a couple of carrots and put them in a large deep pan, place the ribs face down in the pan on top of the garlic, onions and carrots and then add about 1/4 inch of water, a splash of apple cider vinegar and/or a splash bbq sauce (not much sauce at all)...face down.

  4. cover very tightly with aluminum foil and place in oven at 300 degrees for 60 minutes, and then another 60 minutes at 325. (2 hour total cook time)

  5. take ribs out of oven. lay on a baking sheet and brush lightly with sweet BBQ sauce. Finish on a hot grill about 60 to 90 seconds per side. (you can bake them in the oven on the baking sheet for about 5 min at 450 too. Make sure to foil your pan if you do this, cause all the sugars will ruin a cookie sheet when cooked. This step just adds a nice grilling texture to the ribs, but do not grill too long, as they are essentially cooked fully.

  6. Serve with a bowl of warm BBQ sauce, bibs, and good appetite!

Recipe Notes
  1. Don’t use too much sauce when cooking. Let people add it as they want at the table.
  2. You can use a pinch of cayenne (or salt Lick Rub) in the initial rub if you want some heat and spice.
  3. Make sure you remove the silverskin!!
  4. Properly cooked ribs should bit clean from the bone, but not fall completely off the bone without biting.

Good luck!

Share this Recipe
 

Ribs-Smoked

September 4, 2017

This Recipe adds a smoking step to the traditional baked recipe for Ribs.

Ribs-Smoked
Print Recipe
Smoked BBQ Ribs
Prep Time
1
Cook Time Passive Time
4 3
Prep Time
1
Cook Time Passive Time
4 3
Ribs-Smoked
Print Recipe
Smoked BBQ Ribs
Prep Time
1
Cook Time Passive Time
4 3
Prep Time
1
Cook Time Passive Time
4 3
Instructions
  1. Start Smoker, and heat up to a steady @275 degrees, with thin blue smoke from Oak or Hickory wood.
  2. Remove silverskin from bottom of rack of ribs. use a knife to get it started, then grip it with a paper towel and pull it off. Also cut any excess fat as desired.
  3. Prep Ribs with Rub. Coat with Brown Sugar, touch of cayenne, Kosher Salt and a good pork rub and paprika for color. Coat well.
  4. Place ribs on smoker, spray every 30 minutes with apple cider vinegar
  5. after 1 hr 45 minutes on the smoker, take ribs off the smoker and place them in a pan with about 1/4 inch of water, splash of apple cider vinegar and bbq sauce mix...face down. cover tightly with aluminum foil and place in oven at 325 degrees for 90 minutes.
  6. after 90 minutes, take ribs out of oven . lay on a baking sheet and cover with favorite BBQ sauce. Finish on hot grill about 60 to 90 seconds per side. Serve!
Share this Recipe
 

Syrian Rice

August 13, 2017
Serves 8 People
Prep time
35m
Cook Time
25m

This is another recipe handed down through generations in my family. It incorporates a browned pasta (orzo) then a standard cook of non-converted white rice on top of the browned pasta. It’s a real treat, and goes well with anything on the grill, especially chicken, lamb or pork.

Syrian Rice
Print Recipe
Syrian Rice
Print Recipe
Ingredients
Servings:
Instructions
  1. Let water faucet run on hot, draw hot water
  2. add half of butter to a saucepan along with orzo
  3. when just golden brown, add 4 cups of the hottest water possible.
  4. add the rest of the butter and salt - stir until water boils
  5. Once water boils, add the rice
  6. Let it come back to a boil, then cover saucepan and set to lowest flame possible. (this may be a different/back burner on your oven (don't use the large one)
  7. cook 25 min - don't peek often at all. taste test rice until done.
Share this Recipe
 

Syrian Bread

August 13, 2017
Serves 2 Loaf
Equipment
Pizza Peel
Pizza Stone
Cook Time
10m

This recipe is passed on from my family who immigrated from Syria in the early 1900’s. This bread is outstanding, with the only catch that it’s just doesn’t age well. it is meant to be eaten the same day, or usually the same hour it’s cooked.  We enjoy it very much, and I hope you give it a try. Syrian Bread is a bit thicker than Indian Naan, but similar in style.

Syrian Bread
Print Recipe
Syrian Bread
Print Recipe
Instructions
  1. Put dough in an oiled bowl, covered with plastic wrap for 2 hrs. It should double in size or more. (alternatively, put dough in ziplock bag and refrigerate for up to 48 hours)
  2. Preheat oven to 550 degrees with a stone or metal pizza steel inside. (To get the best results, use the convection setting.)...and yes, we are pre-heating for 45 minutes....
  3. Punch the dough down and break in to softball sized balls, and set on an oiled tray. Cover with plastic wrap and let sit for additional 45 minutes to an hour.
  4. Take each ball, put a small amount of flour on one side and stretch out like pizza dough until about 1/2 inch thick. DO NOT use a rolling pin. The way I do this, is using two fists in the middle of the dough ball keeping it up in the air (not on counter), just pull the dough apart slowly and move it around in circles. You can also grab the edges and let gravity help if needed, but this makes it harder to keep a perfect circle.
  5. Place the dough on the hot stone flour side down using a pizza peel, then using the corner of a spatula, cut about 7-8 holes in the dough about 1/2 inch long. (this keeps the dough from puffing up in the center - and maintains the flatbread style consistency we are going for. (The image below shows this done with a fork, but the corner of a metal spatula works and looks better)
  6. cook for about 5-7 minutes until golden on the top (An ovens convection setting works best for this)
  7. remove from the oven using a spatula and let cool on a rack for about 15 minutes.
  8. Repeat for each loaf, allowing about 5 minutes for the stone and over to get back to a high temp.
Share this Recipe